on
Recovering the Intel Management Engine
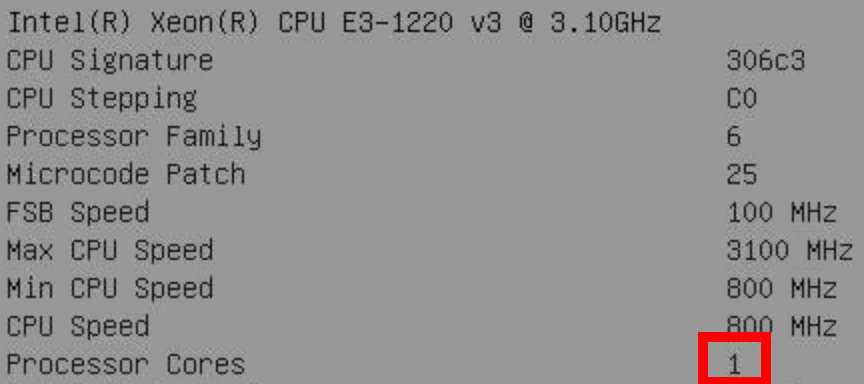
As I was setting up my new NAS, I got a nasty surprise: psrinfo,
Illumos’s command to list processor information, told me that my CPU
only has 1 core. The CPU is a Xeon E3-1220v3, which the Intel
Ark says is a 4-core processor. What’s going on?
I rebooted into the BIOS, checked processor information there, and sure enough, it also reports only 1 core:
Perplexed, I looked around the BIOS for clues, and eventually found this:
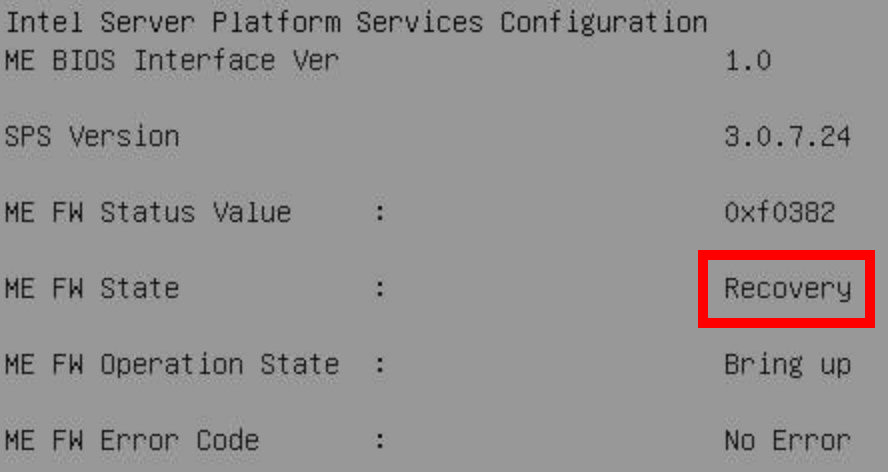
Oh dear. The motherboard’s management engine is very unhappy, and is sitting in recovery mode. In modern Intel systems, the Management Engine is the brainstem of the entire machine. If it’s unhappy, you’re lucky the system is booting at all.
This definitely explains my symptoms. In recovery mode, the ME forces the system into single-core operation, and completely hides the other cores from even the BIOS. It also locks the one remaining core at the lowest operating frequency available, which on my CPU is 800MHz.
So, my 4x3100MHz processor is running at 1x800MHz. That certainly explains why it felt a bit sluggish to boot!
Digging a little further, I find a suspicious number of reports that are about the exact same motherboard as mine, a Supermicro X10SLM+-LN4F. The reports all speak of BIOS updates gone wrong.
Now, I haven’t updated the BIOS on this motherboard. It came from Ebay, and says it’s running the latest BIOS version available. It must have been a fairly recent reflashing, because this latest version includes mitigations for Spectre vulnerabilities. Maybe that went wrong somehow?
Who knows what happened exactly. All I know is my motherboard’s management engine is very unhappy. Thankfully, this didn’t outright brick the motherboard.
As an aside, I find it perplexing that such a severe failure isn’t even worthy of a mention during the boot process. It’s very easy to not notice until you go looking for it.
Manufacturing Mode
Fortunately, a kind soul posted the instructions they got from Supermicro to fix things. These instructions are fairly unusual in one way: you have to put the Management Engine into manufacturing mode..
The motherboard has a jumper on the board, called JPME2. All the
manual says about it is: position 1-2 is normal operation, and
position 2-3 is only used during manufacturing. In other words: here
be dragons, please don’t touch.
This is very interesting. Recently there were a bunch of security disclosures that shed some light on ME’s manufacturing mode. Those disclosures explained that manufacturing mode grants you extended access to the Management Engine, allowing you to do stuff like burn in your OEM public keys for verifying firmware updates. Normally, at the end of the manufacturing run, you irreversibly “close out” manufacturing mode, which locks the board into the normal “consumer” operating mode.
It looks like, on this Supermicro board at least, I can flip this jumper to go back into ME Manufacturing Mode. Among other things, this disables “SPI security verification”, which seems to be the key to getting a working firmware back into the ME.
I’m fascinated by all of this, because this is the first time I’ve seen a firmware upgrade that requires hands-on physical presence at the motherboard to execute. This machine has remote management functionality, so even for a regular BIOS update I can log into the out-of-band controller and run the update from there. For for this recovery update, I have to physically toggle jumpers on the hardware!
Recovering the Management Engine
For posterity, in case the link goes dark, I’ve reproduced the fix instructions below. Keep in mind these were provided by Supermicro support for the X10SLM+-LN4F motherboard only, and that you use them at your own risk. They worked for me, but you might end up bricking your board.
- Create a firmware flashing USB key, by combining a FreeDOS image with the firmware files distributed by Supermicro. This is the same step as for normal BIOS update operations.
- Power off the machine, unplug it from AC power, and open it up to get access to the motherboard.
Locate the
JPME1andJPME2jumpers. SetJPME1to the1-2position (“normal”) andJPME2to the2-3position (“ME manufacturing mode”).The location of the JPME jumpers is documented in the motherboard manual, but here’s a picture in case you need help. They’re along the edge of the motherboard, under the bottom PCI Express slot. In the photo, the jumpers have already been reconfigured. You’ll probably find them both in the
1-2position.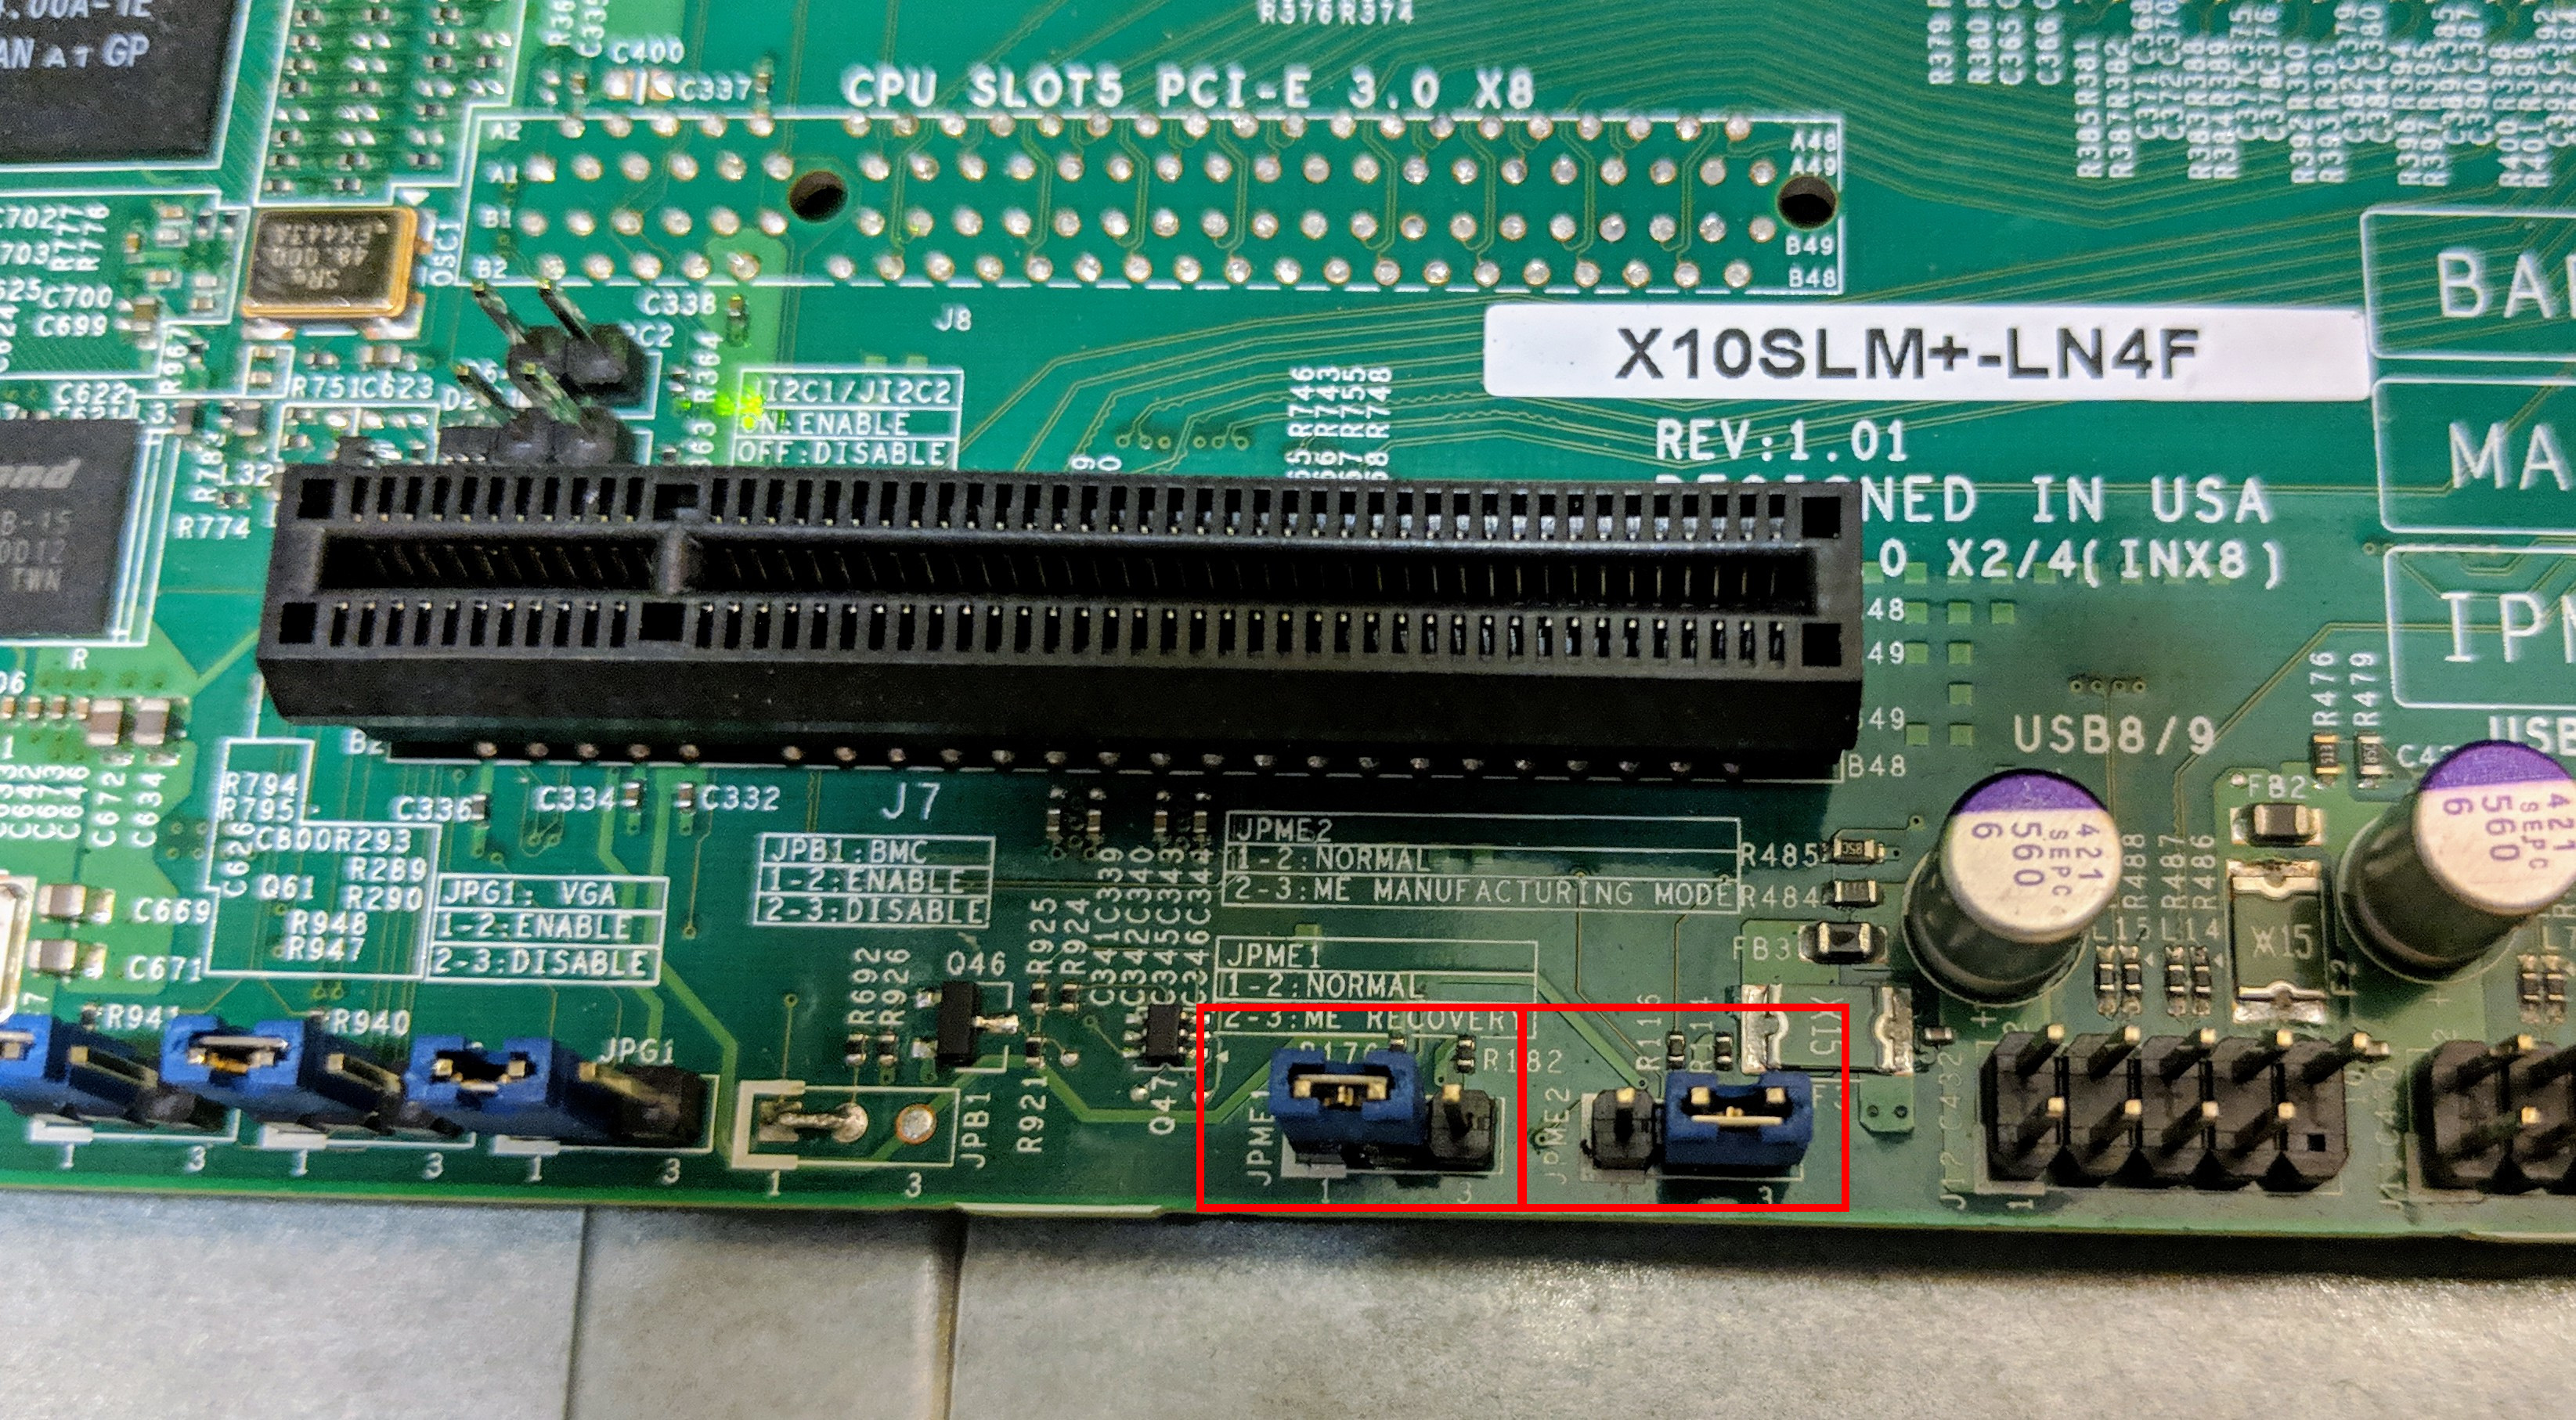
Reconnect AC power, boot the machine onto your USB key, and flash the BIOS as usual. As of writing the firmware revision is v3.2, and for that version the command to run is
AMI.BAT X10SLMP8.510.Wait for the flashing to complete. Be careful! The update tool prints various success-sounding messages during the process, but it’s not 100% finished until you’re dropped back to the
C:\>DOS prompt.For me, the update process printed one error message, in addition to the successes:
Error when sending Enable Message to
 ME!!"
. This doesn’t appear to affect the result, so don’t despair if you see this.When the flashing is complete, power off the machine, unplug from AC again, open the case, and reset
JPME2to the normal position. After this step, bothJPME1andJPME2should be in the1-2position.Clear the CMOS. You can either do this by shorting a really awkward contact on the board for several minutes at a time… Or do what I did, and pop out the CMOS battery. Let it sit without a battery or AC power for 20 minutes, then put the battery back in.
Reconnect AC power and power on. The machine will seem to boot-loop. Don’t panic, this is a normal part of finalizing the firmware update. In my case it powered off and back on 3 times before proceeding with the normal boot sequence.
At the right time, hit
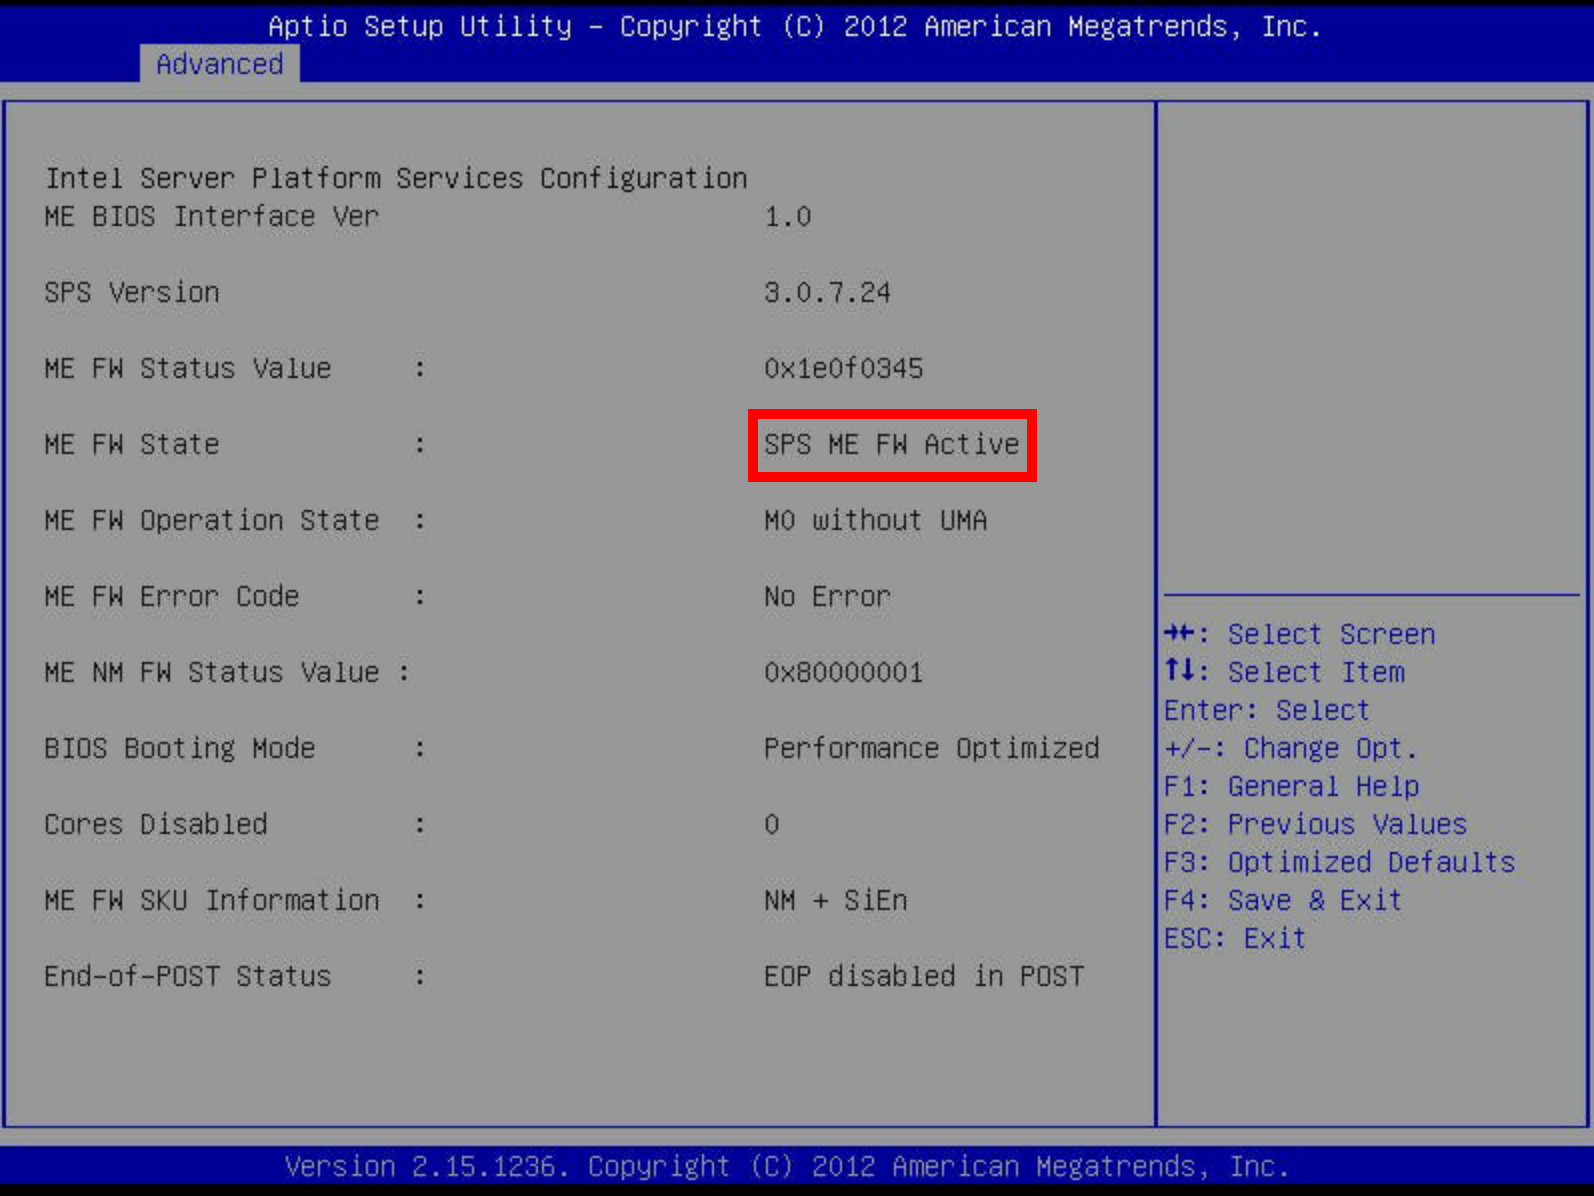
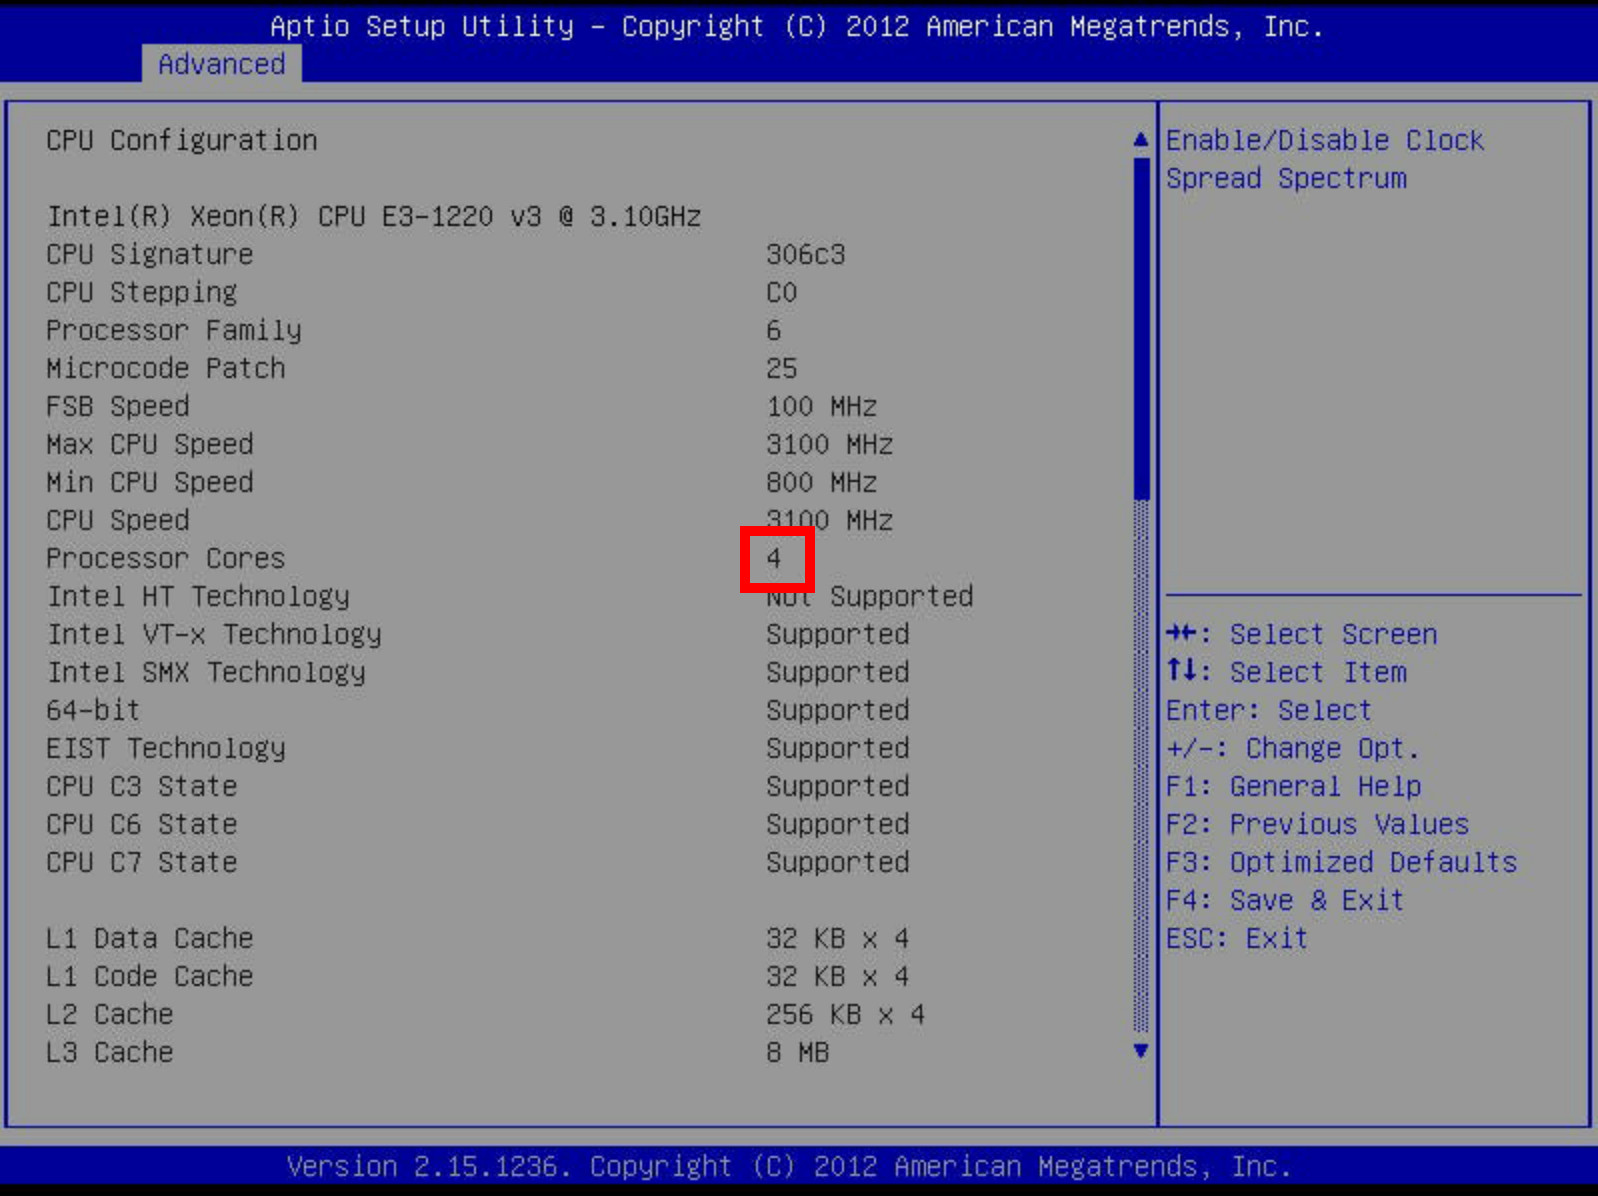
Delto enter the BIOS setup. UnderAdvanced, open theIntel Server Platform Servicessubmenu. If this procedure worked, it should now show a happy “ME FW State” (in my case, “SPS ME FW Active”). Pop out of that menu and into the CPU configuration, and it should now show the correct number of cores, operating at their nominal frequency.