on
Building a NAS, Part 3: Finding and buying parts
In parts one and two we went from a list of requirements to a set of constraints on the hardware we’ll need to buy. In this part, we take to Ebay and turn those vague ideas into a concrete parts list!
This post is part of a series:
- Part 1: Requirements
- Part 2: Storage napkin math
- Part 3: Finding and Buying Parts (you are here)
- Part 4: Assembly
Before we begin, I should caution that this is inherently not a fully repeatable process. Ebay listings are ever changing, and yesterday’s build may no longer be possible today. So, if you’re trying to reproduce this build, your mileage may vary (and of course, I don’t promise that anything I said will work properly if you do it ;) ).
With that out of the way, let’s get building! For a full machine, we need:
- A Motherboard,
- A CPU,
- Some RAM,
- A Chassis,
- A Power supply,
- A SAS HBA,
- A 10G NIC,
- An NVMe PCIe card,
- Various cables.
Chassis parts
Let’s start with the chassis, as that might influence what form factors of motherboards we can use.
You can get broadly two kinds of chassis: those that support standard motherboards and equipment, and chassis designed to tightly integrate with proprietary hardware. If we pick the latter chassis, that gives us no choices at all for the remaining parts, we have to use whatever the vendor designed.
An example of this would be Dell or HP rackmount servers. They’re both popular with homelabbers, and feature very densely packed layouts and proprietary form factors inside the chassis. For example, this is a shot of the inside of a Dell R610 1U server (photo by Jonathan Cutrer):
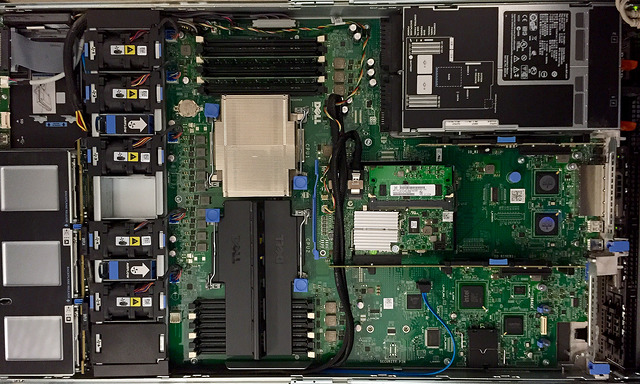
There’s no space wasted in that photo… But it’s accomplished by having a proprietary L-shaped motherboard, nonstandard addon card form factors for things like the HBA, and direct card-edge connectors to the power supply.
If you get one of these, your options for customization shrink drastically: you can swap the CPU with a limited set of alternatives; vary the amount of RAM; choose one of 3 Dell HBAs that fit; and slot in a couple of PCIe cards. But if you wanted, say, an AMD processor, or a newer HBA than Dell offers, you’re out of luck.
We’re not going to go that route. I looked at the machines from Dell that are currently in the pricing sweet spot on Ebay: the R210 II, the R610, the R710, the R620, and the R720. The R720 is close to fitting the bill (and you could certainly do worse), I think we can do a little better for our requirements with a “white box” build using standard parts.
Standard form factors
All that to say: we need to start our search with a chassis that supports standard motherboard form-factors. The easy way to get a sense for brands is to search newegg for, say, “2U chassis”, and look at who comes up.
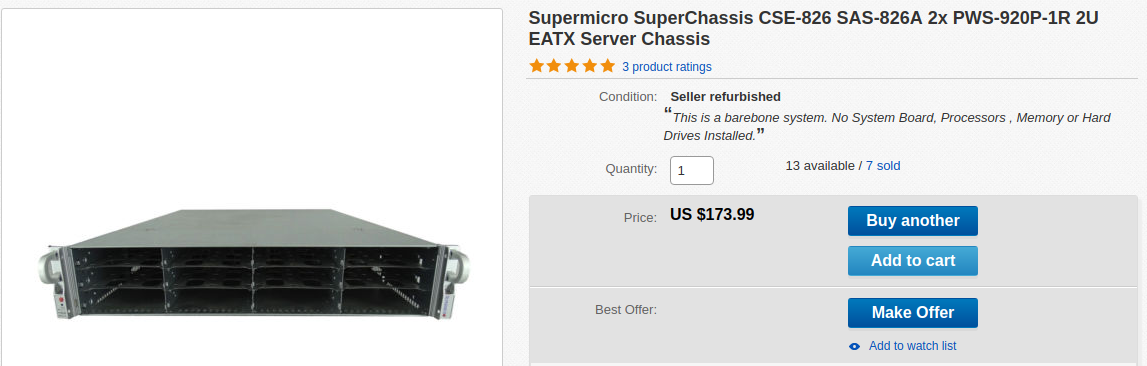
If you do that search, you’ll see that the results are broken down in two categories: Supermicro, and everything else. The Supermicro chassis are much more expensive when purchased new, but also have universal acclaim for their build quality. The cheaper options aren’t bad, but you’ll find a lot of reviews complaining of structural flimsiness, sharp edges, poor cable management options, and so forth. They’re an okay budget option… But on the other hand, for the same price, you can get a used Supermicro chassis!
We wanted 12 or so drive bays, so that takes us back to the Supermicro 826 series of 2U chassis. The series is built up by varying these factors:
- Rev A or Rev B chassis. The Rev B chassis have 2 extra 2.5” hotswap bays at the back, which the Rev A chassis lack. All new chassis are Rev B, and most of the ones on Ebay are Rev A.
- Power supplies. The 826 chassis always features redundant supplies, but with power varying from 500W each to a whopping 1200W each.
- Backplane for the front bays. There’s at least half a dozen different backplane types with different characteristics, which we’ll cover below.
- Rear I/O cutouts. You can have either normal orientation PCIe slots that are limited to half-height cards, or full height PCIe slots turned on their side, for which you need a PCIe riser (example of a riser card below, photo by VIA Gallery by way of Wikimedia Commons).

Aside from Rev B chassis and SAS-3 backplanes, most of the other combinations are available as used items. One thing to note is that different Ebay vendors strip the chassis down: some sell a “barebone” that only includes the sheet metal and backplane, others throw in power supplies and rails, while others still sell you whatever full system they pulled from the datacenter. This can make prices tricky to compare, but you quickly get the hang of it. Just pay close attention to what is actually included in a particular listing.
Before we start hunting for our chassis, we need to look at Supermicro backplanes. They follow a relatively regular, but sometimes confusing, naming scheme. Common backplanes you’ll find are:
BPN-SAS-826TQ: direct-attach backplane with 12 SATA ports. Lots of cabling required, and you’ll need either 12 SATA ports on your motherboard, or SAS-to-SATA “forward breakout” cables. In my opinion, no longer a very interesting backplane due to cabling complexity and the availability of our next entry.BPN-SAS-826A: direct-attach backplane with 3 SAS SFF-8087 ports. Cabling is much more manageable, and you can split your disks between motherboard SATA ports (with a SATA-to-SAS “reverse breakout” cable) and a SAS HBA card.BPN-SAS-826EL1andBPN-SAS-826EL2: Backplane with a SAS-1 expander chip. Do not get these! They suffer from two massive problems: SAS-1 only carries 3Gbps per SAS lane, and the expander chip does not support drives larger than 2TB. They might work for you in specific situations, but in general they’ll just cause misery.BPN-SAS2-826EL1andBPN-SAS2-826EL2: Similar to the previous one, but the expander chip is SAS-2 and does not suffer from the problems of its SAS-1 predecessor. TheEL2variant has 2 expander chips and 2 SFF-8087 ports (one for each chip). This enables SAS multipath, which allows for datapath failover as well as increasing the bandwidth into the backplane. Either is fine, although most home-grade users don’t care about datapath redundancy at this layer.BPN-SAS3-826A: similar toBPN-SAS-826A, but uses the more recent miniSAS-HD (SFF-8644) connectors that can carry the higher bandwidth of SAS-3.BPN-SAS3-826A-N4: same as the previous one, with the exception that 4 of the 12 backplane bays also support NVMe drives, via a separate set of connectors.BPN-SAS3-826EL1,BPN-SAS3-826EL2,BPN-SAS3-826EL1-N4,BPN-SAS3-826EL2-N4: you’re probably getting the pattern by now: expander backplane, with a chip that can do SAS3, and the newer miniSAS-HD connectors. Single or dual expander chip, with or without NVMe connectivity.
On Ebay, you can basically forget about all the BPN-SAS3-
parts. They’re what Supermicro is currently putting in brand new
chassis, so you’re unlikely to find them on Ebay for a good used
price.
The two most common backplanes you’ll get in Ebay chassis are the
BPN-SAS-826A and BPN-SAS2-826EL1, with the BPN-SAS-826TQ and
BPN-SAS-826EL1 trailing behind.
You might have noticed that there’s no BPN-SAS2-826A part. That’s
because there’s no need! The BPN-SAS-826A is electrically compatible
with both SAS-1 and SAS-2, and the connector form factor didn’t change
in those two versions of the protocol. Supermicro simply didn’t bother
issuing a new SKU to fill out the range. Note however that if you’re
trying to run SAS-3, there are reports of it working with the
BPN-SAS-826A, but Supermicro doesn’t guarantee it. You’ll also need
to use converter cables to convert back to the older connector type.
Okay, given all that, and our requirements from part 1, what kind of chassis do we want? We want:
- Rev B. Unlikely we’ll find one, but getting 2 extra 2.5” drive bays for the OS would be choice. Failing that, Rev A will do fine.
- Any power supply. I’ll spare you the math, but fully loaded with NAS drives we could run on the 500W supply if we wanted to. We’ll probably aim for the 800-900W range however, so that the supplies are operating at light-medium load, where they’re most efficient.1
BPN-SAS-826Abackplane. Part 2 has all the details on that choice, I’m just mapping the topology we settled on to the backplane SKU here.- Standard half-height PCIe slots. The ability to host full-size PCIe cards is nice, but in practice all the cards we want are half-height, and it saves us having to futz with a riser and having PCIe boards mezzanined on top of the motherboard (which can have irritating clearance and cabling issues).
With that in hand, I searched for “Supermicro 826” on Ebay, sorted by lowest price, and walked through the results until I found this:
826 Rev A chassis (you can’t see it in that screenshot, but there’s another photo of the back that shows no rear drive bays), with 826A backplane and two 920W power supplies, for $192 shipped (including the tax, which isn’t shown on the listing). Sold!
Before we continue, we need to pick up the couple of parts that are missing from this stripped down chassis. It doesn’t include the drive trays, but $28 from another vendor buys us a dozen of them (search term: “Supermicro drive sled”). And finally, we need chassis rails, which I got for $82. Be sure the kit you get includes both “inner” and “outer” rail sets, unless the chassis you got has the inner ones already attached.
Now that we have a chassis, let’s look at what to put inside!
CPU
In Part 2, we decided that we need a Xeon E5, because of the generous PCIe lane count on that processor family.
The Xeon E5 series is divided into generations that map onto the codenames Intel gives to its CPU architectures:
| Generation | Codename | Model year |
|---|---|---|
| E5 v1 | Sandy Bridge | 2012 |
| E5 v2 | Ivy Bridge | 2013-14 |
| E5 v3 | Haswell | 2014-15 |
| E5 v4 | Broadwell | 2016 |
Starting in 2017, Intel rebranded the series to “Xeon Scalable”, with a completely different nomenclature. We’re going to ignore those since those are the new (and therefore expensive) processors. The E5 v1-through-v4 are the ones we can find readily on Ebay.
Honestly, you’d be well served by any of these. The big leap forwards in processor design happened at Sandy Bridge. Anything before that (e.g. Nehalem, Westmere) are very power hungry processors - powerful, and very cheap on Ebay (you can get a pair of hex-core CPUs for $20!), but you pay for that cheapness in running costs.
In contrast, each generation after Sandy Bridge got a little bit faster, and a little bit more power efficient. Compute power improves significantly at the v3 generation: Haswell was a new microarchitecture, whereas Ivy Bridge was an incremental improvement to Sandy Bridge.
Power consumption on the other hand improves drastically at the v2 generation, when Intel transitioned from the 32nm manufacturing process down to the 22nm process.
Price-wise, each successive generation is a bit more expensive than the last on the used market, as you’d expect. So, we don’t want to blindly pick the v4 if a prior generation will suit us.
For this build, I decided to go with an E5 v3. It’s at a sweet spot for performance per watt, since it benefits both from the new microarchitecture and the 22nm manufacturing process. Additionally, most motherboards out there support both v3 and v4, because Broadwell is the incremental revision of Haswell. That means we can start out with a cheaper v3 CPU today, and if the need arises in future, a v4 CPU is a trivial drop-in upgrade.
The E5v3 lineup
To find a specific processor, we can use a two-pronged approach. On the one hand, we can load the Intel Ark page for Xeon E5 v3, sort by core count or clock speed, and get an idea of what’s out there.
One thing immediately jumps out: the E5v3 series is huge! Core counts go from 4 to 18, and clock speeds from 1.6GHz all the way up to 3.7GHz.
Given our target use (a NAS with some video processing), we’ll probably want to skip the very bottom tier (4 slow cores). On the other hand we also don’t need an 18 core monster. I’d say we’re looking somewhere in the 4-8 core range, with a high clock frequency (>2.8GHz).
Ebay traps
Now for our second approach: punch “E5 v3” into Ebay’s search, sort by lowest price, and browse!
Now, this is where there’s a trap for unaware people: unless you know what you’re getting into, beware the letters ES and QS!
ES and QS stand for “Engineering Sample” and “Qualification Sample” respectively. They’re processors that were made prior to the CPU entering mass production, and were distributed to partners and reviewers for evaluation purposes. For example, motherboard manufacturers might receive some early engineering samples of new processors, so that they can start testing their new products.
The key thing to know is that these are not production grade chips. In theory, they should be functionally equivalent to the mass production models, but there are no guarantees whatsoever. For all you know, the processor might have a defect that was fixed prior to mass production, or might have a shorter life expectancy because the manufacturing process wasn’t completely figured out yet.
So, if these are dodgy CPUs, why would you ever buy them? Because they’re usually discounted 50% or more compared to the genuine article. So, if you’re willing to gamble, you could pick up a fantastic deal… Or you could pick up a CPU that will subtly corrupt your data.
For a NAS, I decided not to risk it, so I’m ignoring all ES and QS listings. I’m also checking the listing photos to make sure the etching on the CPU does not say “Intel Confidential”, which is the mark of an engineering sample.
Picking a CPU
One final thing to note: the E5 lineup is divided into two families, E5-1600 and E5-2600. While you can pick either, the 2600 family is designed for multi-socket systems, whereas the 1600s are designed to run standalone on single-socket motherboards. That means the 1600 series is usually cheaper, because it lacks the silicon to deal with cross-socket synchronization.
With all that in mind, I combed the listings and narrowed the search down to one of two processors: the E5-1620v3 (4c/8t, 3.5GHz, ~$140) and the E5-1650v3 (6c/12t, 3.5GHz, ~$235). They’re effectively the same chip with different core counts. The 1650 is slightly more expensive per core, but the scaling is pretty linear: $35-39 per core.
I offered both options to the end user, and they opted for the hex-core E5-1650v3.
Phew, those were long sections! Fortunately, it’s mostly all downhill from here. The remaining hardware is a simpler set of choices.
HBA, 10G NIC, NVMe adapter
We’ll pick out peripherals before the motherboard, so we know what kind of PCIe slots we need.
Throughout all this, pay attention to card height so that everything fits in 2U. You want half-height (aka “low profile”) PCIe cards. Most cards out there are sold with interchangeable full-height and a half-height brackets, but some Ebay listings will sell you only “whichever one is currently attached to the card” as-is.
If you end up with the wrong bracket, you can usually search “(card name) half height” to pick up just the half-height bracket for under $5.
HBA
We need a 2-port SAS-2 HBA that supports PCIe gen3. Where will we find that?
Thankfully, user mobilenvidia on the ServeTheHome forums created a great reference of LSI HBAs, which lists the capabilities of each chip in the LSI lineup, and the cards based on those chips.
Looking through the list, we want a card based on the LSI 2308 controller. Searching for the matching model numbers on Ebay, it looks like the LSI SAS 9207-8i is a popular and affordable board, at $65 or so.
Note that you might come across the LSI 9208-8i, and it might worry you that this card doesn’t seem to exist on Broadcom’s website (they own LSI now). Don’t worry, it’s a genuine card. It’s a layout variant of the 9207-8i where the SAS ports point upwards, instead of horizontally. If you’re building in a 3U or taller chassis, the 9208 will save you $20. And you should be able to use the 9207 firmware on it, since they’re identical aside from the port layout.
Unfortunately we’re in 2U, and vertical ports would force us into tight bends and putting strain on the connectors. So, we’ll stick with the 9207.
10G NIC
In the 10G space, the two big names on the used market are Mellanox and Intel. It’s hard to go wrong if you pick either of those.
One question we haven’t answered yet: do we want a card with SFP+ connectors, or hardwired 10G copper ports? SFP+ gives us the flexibility to use any physical medium, in particular fiber optic cable. However, we’ll incur additional costs because we’ll have to purchase the appropriate SFP+ transceivers in addition to the NIC.
In this case, we’re going to go with SFP+ for flexibility. And for even more flexibility, we’re going to go with dual SFP+, in the form of the Intel X520-DA2. It’s not the cheapest thing on the market at $100 (compared to ~$50 for a single-transceiver card), but it’s within budget and gives the NAS some solid future-proofing. 20Gbps should be enough for anyone, right?…
NVMe adapter
We want an adapter card that lets us attach two M.2 NVMe drives. I know nothing about these, so just searched for “dual NVMe PCIe” and looked through the new offerings on Amazon to get a feel for the space.
One thing I found that you should be wary of: some vendors sell “dual NVMe PCIe adapters” that are in fact 1x NVMe and 1x SATA. Make sure the card you get can do NVMe in both slots! Also pay attention to the card height, a lot of these adapters are aimed at gaming PCs rather than servers, and so end up being full height (half-height is more common in the server space, for chassis universality).
In this case, it turns out that Supermicro sells a dual NVMe addon card themselves, the AOC-SLG3-2M2. This is the only part of this build that’s new rather than used, but at $70 it’s hard to say no to a known quantity, rather than gamble with a generic vendor.
Motherboard and RAM
Finally, now that we’ve picked out a CPU and our addon cards, we can look at motherboards. To sum up, we need a motherboard with:
- A single LGA2011 socket, supporting Xeon E5v3
- 4 SATA ports for the backplane hookup
- 2 PCIe gen3 x8 slots (one for the HBA, one for the NVMe adapter)
- 1 PCIe gen2 or gen3 x8 slot (for the 10G NIC)
- Built in remote management (usually listed as “IPMI” in the feature set)
Again I’m going to look exclusively at Supermicro motherboards here, because they’re solid boards from a well known manufacturer. Additionally, their remote management tooling is quite pleasant to use, so I tend to stick with them just for that, after terrible experiences with Java-based KVM consoles. And finally, Supermicro motherboard in Supermicro chassis is a nice combo, because all the connections for backplane management cables and the like fit neatly together, rather than have to research how to adapt the pinouts to a different motherboard.
The CPU generation we’re looking at straddles the X9 and X10 families of motherboards (X11 being the latest gen). We’re not fussed as to exactly which board we get, as long as it has the things above.
I simply searched for “Supermicro X10 E5”, to get only X10 boards that support the Xeon E5 (the X10 range also supports Xeon E3, among others), sorted by cheapest, and browsed the results.
One of the first boards on the list fit the bill: the Supermicro X10SRL-F. And what a board it is! It can run five PCIe gen3 x8 cards, giving us room for a second NVMe card and a second HBA if we wanted to. It has ten onboard SATA ports, including two that support SATA DOM modules, which are perfect as OS disks for our build. And to round it off, if 2x10G wasn’t enough network bandwidth, there’s a pair of 1Gbps interfaces built into the chipset as well. And, of course, Supermicro’s IPMI running over a dedicated LAN port.
Honestly, I don’t think I could have asked for a better board to come near the bottom of the price pile! At $215, it’s not exceptionally cheap, but wow does it have a lot of bang for buck.
And finally, now that we have a motherboard, we know what kind of RAM it wants. And, bad news! It’d DDR4 Registered ECC. That’s unfortunately some of the most expensive RAM around right now. I got a 4x8GiB kit for $220.
Roundup
Phew, we’re done with parts selection! The only other thing I needed was two regular SAS cables and one reverse breakout cable, but I just got those from Amazon because there was no price benefit to getting used ones.
So, what’s the total damage?
| Part | Name | Cost |
|---|---|---|
| Chassis | Supermicro 826, 826A backplane, 2x920W PSU | $190 |
| Drive Sleds | 12x Supermicro 826 drive sled | $28 |
| Rails | Supermicro 2U/3U rail kit | $82 |
| CPU | Xeon E5-1650 v3 (6c/12t, 3.5GHz) | $235 |
| SAS HBA | LSI SAS 9207-8i | $65 |
| 10G NIC | Intel X520-DA2 | $100 |
| NVMe Adapter | Supermicro AOC-SLG3-2M2 | $70 |
| Motherboard | Supermicro X10SRL-F | $215 |
| RAM | 4x8GiB DDR4 ECC Registered | $220 |
| Cables | 2x SFF-8087, 1x Reverse Breakout | $35 |
| Total | $1240 |
There we go, $1240 (tax+shipping included) for a NAS that can handle whatever kind of storage you throw at it, while doing video transcoding and hosting a bunch of containers. It’s certainly not cheap in the absolute (and we haven’t put in drives yet!), but I priced out something of similar capability at a Supermicro integrator, and with all new hardware this kind of loadout would cost over $3000.
As you’ve seen through this series of posts, we had a whole bunch of choices to make, and some of those choices would have led to a cheaper build. Ultimately, the end user of this machine decided to go for the fully loaded option, but here’s some options I offered to get the price down:
| Option | Savings |
|---|---|
| CPU downgrade to E5-1620v3 | -$110 |
| NIC downgrade to 1xSFP+ | -$50 |
| RAM downgrade to 16GiB | -$110 |
| Skip the NVMe adapter for now | -$70 |
| Downgrade to E5 v1/v2 | -$100—200? |
| Downgrade to E3, 1xSFP+, no NVMe | -$400—600? |
The first four are fairly self-explanatory. The last two are more serious redesigns of the system. Downgrading to a v1/v2 CPU and motherboard would drop the price of both, and likely get us back to more affordable DDR3 memory as well.
Downgrading all the way to an E3 would put us back in the “budget server” hardware category, where we can get significant savings just by not being in the high roller bracket2. However, that would require compromising on some of the requirements for the build. Notably, you could have either of 10G networking or NVMe drives, but not both, due to the dearth of PCIe lanes on the E3 platform.
And that’s it! I placed the order yesterday, and I’m now waiting for the 10 different merchants to get the hardware to me for assembly. That’ll take a couple of weeks, after which we’ll resume with part 4, build log.
Questions, thoughts? Hit me up on Twitter.
There’s also a whole discussion we could have here about PSU noise. Some of the Supermicro PSUs are jet engines, while others are whisper quiet. For this end-user, the noise wasn’t relevant, so I’m ignoring that in the search. If you care about PSU noise, look for the 500W supplies, or the 920W ones with
[return]SQin their part number. SQ stands for “Super Quiet”, and they live up to their name!Incidentally, this is what I did for my own NAS build, which I’ll write about some day. It’s the little brother of this build for spinning drives and lighter compute workloads.
[return]